Site Features
Getting Started in the Hobby
Model Categories
- TV, Movie, & Pop Culture (Titles # - A)
- 7th Heaven Renault Type AG
- 200 MPH Nissan 370Z
- 2001: A Space Odyssey Monolith
- 2012 Lincoln Town Car Limo
- 2044 Peacekeepers Ford Expedition
- 3000 Miles to Graceland 1959 Cadillac
- A-Team Chevrolet Corvette
- A-Team GMC Van
- Addams Family Limo
- Adderall (Corvette Corvette) 2021 Corvette
- Adventures of Jimmy Neutron Rocket
- Agents of SHIELD Hell Charger
- Agents of SHIELD Lola
- Alone in the Dark VW Touareg
- American Graffiti '32 Ford Coupe
- "The Animal" Angry ATV
- Animal House Deathmobile
- Animal Precinct Crown Victoria
- Atomic Blonde Porsche 911
- Austin Powers Shaguar
- Austin Powers 3 Shaguar
- Automan Lamborghini Countach
- Avatar AT-99 Scorpion
- Avengers Lotus Elan
- Avengers Grimm Camaro ZL1
- TV, Movie, & Pop Culture (Titles B)
- Back to the Future DeLorean Time Machine
- Bang Bang Challenger
- Barbie Silver Vette
- Baywatch Ford Ranger
- Bedazzled Lamborghini Diablo
- Beetle Bailey Jeep
- Bertha Benz: The First Driver Benz Patent Motorwagen
- Beverly Hillbillies Truck
- Beverly Hills Cop Nova
- Bigfoot & the Muscle Machines Bigfoot
- Bigfoot & the Muscle Machines Black Gold
- Bigfoot & the Muscle Machines Orange Blossom Special II
- Bigfoot & the Muscle Machines War Lord
- Birds of Prey Hummer H2
- Black Mirror MX-5 Miata
- Black Swan Taxi
- Black Top Warriors Alley Rat
- Black Top Warriors Killer Bee
- Black Top Warriors Pink Poison
- Blade 1968 Dodge Charger
- Blade Runner Spinner
- Blonde Comet Kurtis Kraft
- Blood Drive 1967 Camaro
- Born 2 Race Subaru Impreza WRX STi
- Bounty Killer Ford Mustang
- Bourne Identity Mini
- Bourne Ultimatum NYPD Impala
- Brazil Microcar
- Bruce Almighty Saleen S7
- Bullitt Mustang
- Bullitt Charger
- TV, Movie, & Pop Culture (Titles C)
- C'était un rendez-vous Ferrari 275 GTB
- Captain America: The Winter Soldier Chevrolet Corvette
- The Car Lincoln Continental Custom
- Cars Lightning McQueen
- Cars Sarge
- Cars 3 Cruz Ramirez
- Cars that Ate Paris VW
- Charlie's Angels 1969 Camaro
- Chase BMW 325is
- Chuck Norris Karate Kommandos Corvette
- Circuit Wolf BMW 3.0 CSL
- Circuit Wolf Lamborghini Jota
- Circuit Wolf Lamborghini Miura

- Circuit Wolf Lotus Europa
- "City Slicker" 1969 Dodge Charger
- Circles Around this Town Dodge Diplomat
- Cobra 1950 Mercury
- Collier & Co. Traveller
- Crawling Eye Citroen Traction Avant
- Crusher Joe Hunter "Diskhound"
- CSI: Miami Hummer H2
- Ctrl-Alt-Del X-Bot Zeke
- TV, Movie, & Pop Culture (Titles D)
- Danger Mouse Mk III
- Dark Harvest 2: The Maize Durango
- Dark Shadows Barnabas Vampire Van
- Day of the Cheetah XF-15F
- Day the Earth Stood Still Gort
- Dead Pool Corvette R/C Car
- Deadpool Taxi
- Death Proof Dodge Challenger
- Death Racers Lotus Elise
- Demolition Man Oldsmobile 442
- Deuce of Spades Ford Roadster
- Diamonds are Forever Mustang
- Dick Tracy 1936 Ford
- Dilbert Carbicle
- Dirty Dancing 1957 Chevrolet
- Dirty Dozen Jeep
- Dirty Mary, Crazy Larry 1969 Dodge Charger
- Doctor Who TARDIS
- Dr. No Sunbeam Alpine
- Drag it Out 2020 Corvette
- Draw 50 Monsters... UR2EZ
- Drive 1973 Chevelle
- Driven Target CART Racer
- Driver's License Mercedes-Benz 450 SL
- Duel Peterbilt Tanker
- Dukes of Hazzard General Lee
- Dukes of Hazzard General Lee (undercover)
- Dukes of Hazzard Jeep
- Dukes of Hazzard Roadrunner
- Dukes of Hazzard (movie) General Lee
- Dukes of Hazzard (AutoTrader) Viper
- Dune Sand Crawler
- TV, Movie, & Pop Culture (Titles E - F)
- Edge of Tomorrow Sgt Rita Vratraski
- Evangelion Renault Alpine A310
- Evangelion (Rebuild) Mazda Cosmo Sport
- eX-Driver Lancia Stratos
- eX-Driver Lotus Europa
- Explorers Thunder Road
- Fahrenheit 451 Salamander
- Fallout Highwayman
- Fast & Furious (Complete Series)
- Fast & the Furious (1955) Jaguar XK120
- Finish Line Shelby Cobra 427 S/C
- Fireball 500 Kustom Plymouth
- Flintstones Flintmobile
- Flintstones Fred's Cruiser
- Forbidden Planet Robby the Robot
- Ford v Ferrari GT40
- Ford v Ferrari 330 P
- Fortnite Red-Nosed Raider
- Frame Arms Gourai and Mechatro WeGo
- From Russia with Love Chevrolet Truck
- TV, Movie, & Pop Culture (Titles G)
- Galactic Drifter Vifam EVA-WP-4000 Allover
- Galactic Drifter Vifam EVA-WP-6000 Twinklehead
- Garbage Pail Kids Hot Head Harvey/Roy Bot
- Gattaca Citroen DS 19
- Genesis Climber MOSPEADA Ride Armor VR-038L
- Genesis Climber MOSPEADA Ride Armor VR-052F
- Ghost in the Shell Motoko Kusanagi
- Ghostbusters Pre-Ectomobile
- Ghostbusters Ecto-1
- Ghostbusters (RGB) Ecto-1
- Ghostbusters 2 Ecto-1A
- Ghostbusters: The Video Game Ecto-1B
- Ghostbusters (LEGO Dimensions) Ecto-1
- G.I. Joe RAM
- Godzilla: Invasion of Astro-Monster Planetary Defense Vehicle Willys Jeep MB
- Goldeneye BMW Z3
- Goldfinger Aston Martin DB5
- Gone in 60 Seconds (1974) Eleanor Mustang
- Gone in 60 Seconds 2 Slicer
- Good Guys Wear Black Porsche
- Gotcha! Citroën 2CV
- Graduate Alfa Romeo 1600
- Grease White Lightning
- Great Escape Motorcycle
- Green Hornet Black Beauty
- Gremlins Toy Corvette
- Gremlins VW Beetle
- Gunsmith Cats 1967 Shelby GT-500 Mustang
- TV, Movie, & Pop Culture (Titles H - I)
- H.G. Wells' War of the Worlds Monte Carlo SS
- Hairspray 1961 Corvette
- Half-Life 2: Episode 2 Muscle Car
- Halo M12B Tundra Warthog
- Harry Potter and the Chamber of Secrets Anglia 105E
- Hate You Hummer H2
- Hatsune Miku
- Heart Like a Wheel Mustang Funny Car
- Hell Comes to Frogtown Chevrolet Panel Truck
- Herbie The Love Bug VW Beetle
- Herbie Rides Again VW Beetle
- Hidalgo
- Highway Patrol Buick
- Honey West Shelby Cobra 289
- Hooper Firebird Trans Am
- Hot for Teacher Ford Phaeton
- Hot Rods to Hell Corvette
- Hot Wheels "Sweet 16" Silhouette
- House of Wax 1968 Dodge Charger
- I Am Legend Shelby GT-500 Mustang
- "I Want to Believe" UFO
- Indiana Jones and the Last Crusade Motorcycle
- Inspector Gadget Gadgetmobile
- Inglorious Bastards Jeep
- Interstellar Pig VW Convertible
- The Island Chevrolet SSR
- It's Walky! 1986 Dodge Ram 50
- It's Yourz Dodge Viper
- iZombie Police Car
- TV, Movie, & Pop Culture (Titles J - K)
- Jack Reacher 1970 Chevelle
- Jaws Chevy Blazer
- Jericho 1969 Plymouth Roadrunner
- Jetsons Spaceship
- Jigoro Jigorou Nana Okada's Toyota Celica
- Jimmy Neutron: Boy Genius Rocket
- Joe Dirt 1969 Dodge Charger Daytona
- Judge Parker Corvette
- Junkman 1981 Corvette
- Jurassic Park Jeep Wrangler
- Jurassic Park Toyota Land Cruiser
- Jurassic Park 2 (The Lost World) Ford Explorer
- Jurassic Park 2 (The Lost World) Hunter's Humvee "Snagger"
- Jurassic World Mercedes-Benz G550
- Kamen Rider Cyclone
- Kamen Rider Hurricane
- Kamen Rider New Cyclone
- Karate Kid Ford Convertible
- Kelly's Heroes Jeep
- Kia Hamstar Box
- Knight Rider Classic KITT
- Knight Rider Legends KITT
- Knight Rider Camaro KITT
- Knight Rider 2000 Knight 4000 (KIFT)
- TV, Movie, & Pop Culture (Titles L)
- Lamborghini American Challenge Diablo Roadster
- Land of Confusion Tank
- Last of Us Chevy S-10
- Last Stand Camaro
- Left 4 Dead 2 Jimmy Gibbs, Jr. Stock Car
- Legends of the Superheroes Batmobile
- LEGO 2K Drive Modified Race Cars
- LEGO Dimensions Ecto-1
- LEGO Movie Super Cycle
- LEGO Movie 2 Escape Buggy
- Levitating 1969 Barracuda
- Little Old Lady from Pasadena 1964 Dodge 330 Super Stock
- Little Red Corvette 1957 Corvette
- Live a Little, Love a Little Meyers Manx
- Love Bug Herbie
- Lupin III: Castle of Cagliostro Fiat 500
- TV, Movie, & Pop Culture (Titles M)
- Mac and Me Power Wheels Truck
- Mad Max Holden Sandman
- Magnum, P.I. Ferrari 308 GTS
- Mall Monkeys Security Vehicle
- Man from U.N.C.L.E. Piranha
- Man with the Golden Gun AMC Hornet
- Mannix Oldsmobile Toronado Roadster
- Married...With Children Dodge
- Matchbox '83 Corvette
- Matchbox Bedford Wreck Truck
- Matrix: Reloaded Escalade
- Mechatro WeGo Sports #5
- Mechatro WeGo Sports #7 (JPN)
- Mega Shark vs Giant Octopus Mini Cooper
- Megafault Dodge Ram
- Men in Black 3 Ford Galaxie
- Metal Slug SV-001/I
- Miami Vice Ferrari 365GTS/4 Daytona
- Micro Machines Charger
- Misfile BMW M3
- Misfile Acura RSX-S
- Misfile Jaguar XKR
- Misfile Merkur XR4Ti
- Misfile Merkur XR4Ti Monster
- Misfile Nissan 240SX
- 『Moi』JGSDF 07 Tank Nacchin
- Monkees Monkeemobile
- Monster Garage Nut Shaker
- Monster Garage Wedding Chapel
- Mouse and the Motorcycle Bike
- Munsters Drag-U-La
- Munsters Koach
- Murciélago Lamborghini Roadster
- Mythbusters Impala Rocket Car
- TV, Movie, & Pop Culture (Titles N - Q)
- Need for Speed 2015 Mutang GT
- Neon Genesis Evangelion Renault Alpine A310
- Never Too Young to Die Corvette
- New Monkees Mustang GT
- Night is Still Young Lamborghini Murciélago
- Night Watch Audi TT
- A Nightmare on Elm Street Cadillac Convertible
- Ninja Cheerleaders VW Beetle Convertible
- Ninjago Ultra Sonic Raider
- Ocean's Eleven Ford Falcon Futura
- Outer Space Men Terra Firma
- Over Rev! Toyota MR2
- OutRun (Kavinsky) Ferrari Testarossa
- OutRun (Sega) Ferrari Testarossa
- The Outsider 1969 Dodge Charger
- P2 Oldsmobile Cutlass Supreme
- Paprika Aston Martin DB7
- Paris, Texas Ranchero
- Pearls Before Swine Revenge-O-Mobile
- Philadelphia Experiment 1968 Dodge Charger
- Piranha 3D Police Car
- Porky's Hudson Hornet
- Portal 2 Defective Sentry
- Pretty Fly (for a White Guy) Pinto
- Princesses vs. Zombies Ferrari 250
- The Prisoner Lotus 7
- PvP Mini Cooper
- Queens Logic VW Beetle
- TV, Movie, & Pop Culture (Titles R)
- Race Forever Lancia Stratos
- Raiders Coach
- Rain Man Buick Roadmaster
- Ready Player One Ecto-88
- Real Drift Corvette Z06
- Real Ghostbusters Ecto-1
- Rebuild of Evangelion Mazda Cosmo Sport
- Red Line 7000 Ford Galaxie
- Red Notice Porsche Taycan
- Resident Evil Raccoon City Police Car
- Rick and Morty Space Cruiser
- Riptide 1960 Corvette
- Robot Chicken: Turbo Teen Parody
- Robotech Cyclone VR-038
- Robotech Cyclone VR-052
- Rocket Car 1959 Chevy Impala
- Romancing the Stone Little Mule
- Rush McLaren M23
- Rush Hour 1972 Corvette
- TV, Movie, & Pop Culture (Titles Sa-Sm)
- Safe Crown Victoria
- Scooby Doo Mystery Machine
- Scooby Doo/We've Got Some Work to Do Now Misery Machine
- Sex Drive 1969 GTO
- Shakotan Boogie Toyota Celsior
- Shakotan Boogie Yanky Mate!
- Sharky's Machine Dodge Diplomat
- Short Time Dodge Diplomat
- Silver Spectrum Ford Deluxe
- Silverhawks Steelheart
- Simpsons Canyonero
- Simpsons Family Sedan
- Simpsons Honor Roller
- Simpsons Malibu Stacy Car
- Simpsons Mr. Plow
- Smokey & the Bandit Firebird
- Smokey & the Bandit 2 Firebird
- TV, Movie, & Pop Culture (Titles Sn-Sz)
- Sound of Music Mercedes-Benz 540K
- Space: 1999 Moon Buggy
- Speed Buggy Speedy
- Speed Demon 1970 Chevelle
- Speed Racer F1 Mach V
- Speedway Dodge Charger
- Spiral Zone Unicycle & Zone Rider
- Spy Who Loved Me Lotus
- SpyHunter Lamborghini Diablo
- SpyHunter 2 Saleen S7
- Star Trek Galileo
- Star Wars (Complete Series)
- Starsky & Hutch Ford Torino
- State of Fear Ferrari 365GTS/4 Daytona
- Steel Monsters Enforcer
- Steven Universe Van
- Stingray 1965 Corvette
- Stranger Things Chevy Van
- Stroker Ace Chicken Pit Special
- "Stylo" Camaro
- Super Robot Mach Baron Mach Trigger
- Supercar
- Supernatural 1967 Impala
- Supernatural 1971 Chevelle
- TV, Movie, & Pop Culture (Titles T)
- Taarzan the Wonder Car Honda CRX
- Tekkonkinkreet Colt Galant
- Terminator Custom Chevy Pickup
- Terminator 2 Cyberdyne T-800
- Terminator 2 Harley-Davidson
- Terminator 3 Lexus SC430
- Thinner Chevy Nova
- Three Stooges Ford Panel Truck
- Thunderbolt & Lightfoot Firebird
- Thundercats Cheetara
- Tomb Raider: Cradle of Life Jeep
- Top Gear The Stig
- Toy Story Pizza Planet Delivery Truck
- Trail of Lightning 1972 Chevy Pickup
- Transformers (Complete Series)
- Transmorphers: Fall of Man Police Car
- Transporter BMW 735i
- Trollenberg Terror Citroen Traction Avant
- Tron Legacy Clu's Light Cycle
- Tron Legacy Sam's Light Cycle
- Turbo Teen
- Turbo Teen (Robot Chicken Parody)
- Twilight 1963 Chevy Step Side
- Two and a Half Men Mercedes CL
- TV, Movie, & Pop Culture (Titles U - Z)
- V Laser Jeep
- Vacation Wagon Queen Family Truckster
- Vanishing Point Dodge Challenger
- Vanishing Point (1997) Dodge Challenger
- Vifam EVA-WP-4000 Allover
- Vifam EVA-WP-6000 Twinklehead
- V.I.P. Jaguar XK8
- Viper Dodge Stealth R/T
- Viper Dodge Viper GTS
- Viper Dodge Viper RT/10
- Walking Dead M35A3
- Walking Dead Triumph Bonneville Chopper
- Walking Dead Winnebago Chieftain
- WALL·E
- Wangan Midnight Devil Z
- War of the Worlds Monte Carlo SS
- Wayne's World AMC Pacer "Mirthmobile"
- The Wedding Singer DeLorean
- Wheels of Terror Dodge Charger
- White Line Fever Blue Mule
- Winning Eagle Offenhauser
- World is Not Enough BMW
- xXx 1967 GTO
- You're Under Arrest: No Mercy! Police Car
- Zessyaka! Subaru 360 Deluxe
- Zombieland Cadillac Escalade
- ZZ Top Eliminator
- Batmobiles (1930s - 1970s)
- 1939 Detective Comics #27 Batmobile (Batman's First Car)
- 1944 Batman #20 Batmobile
- 1944 Batman #25 Batmobile
- 1948 Batman #47 Batmobile
- 1950 Detective Comics #156 Batmobile
- 1952 Batman #73 Batmobile
- 1964 Batman #164 Batmobile
- 1966 Batman Batmobile
- 1968 Detective Comics #377 Batmobile
- 1969 Detective Comics #394 Batmobile
- 1970 Detective Comics #400 Batmobile
- 1972 Detective Comics #420 Batmobile
- 1972 Batman #246 Batmobile
- 1977 Batman #288 Batmobile
- 1979 Legends of the Superheroes Batmobile
- Batmobiles (1980s - Present)
- 1980 Batman #330 Batmobile
- 1987 Batman #408 cover Batmobile
- 1987 Batman #408 interior Batmobile
- 1989 Detective Comics #597 Batmobile
- 1989 Batman Batmobile
- 1989 Batman Batmobile (1/32 scale)
- 1990 Legends of the Dark Knight #5 Batmobile
- 1992 Batman the Animated Series Batmobile
- 1992 Batman Returns Batmobile
- 1992 Batman Returns Batmissile
- 1995 Batman Forever Batmobile
- 1997 Batman & Robin Batmobile
- 2001 Gotham Knights #16 Batmobile
- 2004 Teen Titans #9 Batmobile
- 2005 Detective Comics #800 Batmobile
- 2005 Batman Begins/The Dark Knight Batmobile
- 2005 Batman/Danger Girl Batmobile
- 2006 Legends of the Dark Knight #198 Batmobile
- 2006 Batman: Man-Bat Batmobile
- 2008 Batman and the Outsiders #8 Batmobile
- 2008 LEGO Batman Batmobile
- 2016 Batman v Superman Batmobile
- 2017 The LEGO Batman Movie Batmobile
- 2017 The LEGO Batman Movie Ultimate Batmobile
- Custom 1970 Batmobile (Hallmark)
- Custom 1995 Batmobile
- Phantom "Black Force" Batmobile
- The Fast and the Furious
- Fast & the Furious 1 (TF&TF) 1970 Chevrolet Chevelle
- Fast & the Furious 1 (TF&TF) 1970 Dodge Charger
- Fast & the Furious 1 (TF&TF) Honda Civics
- Fast & the Furious 1 (TF&TF) Mazda RX-7
- Fast & the Furious 2 (2 Fast, 2 Furious) Mitsubishi Eclipse Spyder
- Fast & the Furious 4 (Fast & Furious) 1970 Dodge Charger
- Fast & the Furious 5 (Fast Five) 1963 Ford Galaxie
- Fast & the Furious 5 (Fast Five) 1970 Dodge Charger
- Fast & the Furious 5 (Fast Five) Dodge Charger Rio Police
- Fast & the Furious 5 (Fast Five) Nissan GT-R (R35)
- Fast & the Furious 6 (Furious 6) 1969 Dodge Charger Daytona
- Fast & the Furious 7 (Furious 7) 1970 Dodge Charger
- Fast & the Furious 7 (Furious 7) 1970 Dodge Charger (Off-Road)
- Fast & the Furious 7 (Furious 7) 1972 Plymouth ‘Cuda
- Fast & the Furious 7 (Furious 7) McLaren MP4-12C
- Fast & the Furious 7 (Furious 7) Toyota Supra
- Fast & the Furious 8 (Fate of the Furious) Plymouth GTX
- M.A.S.K.
- Star Wars
- Transformers G1/G2 (1984 - 1995)
- G1 Bluestreak (Anime) - Datsun 280ZX
- G1 Bluestreak - Datsun 280ZX
- G1 Bumblebee - Volkswagen Beetle
- G1 Camshaft - Mazda RX-7
- G1 Cliffjumper - Porsche 924
- G1 Hoist - Toyota Hilux Tow Truck
- G1 Hound - U.S. Army Jeep
- G1 Huffer - Yard Truck
- G1 Ironhide - Nissan Onebox Vanette
- G1 Kup - Pickup Truck
- G1 Jazz - Porsche 935
- G1 Ladybug - Volkswagen Beetle
- G1 Mirage - Ligier JS-11
- G1 Mixmaster - Cement Mixer
- G1 Nightbeat - Porsche 959
- G1 Optimus Prime - Freightliner COE
- G1 Prowl - Datsun 280ZX Police Car
- G1 Ratchet - Nissan Onebox Ambulance
- G1 Red Alert - Lamborghini Countach
- G1 Road Rage - Chevrolet Corvette
- G1 Sideswipe - Lamborghini Countach
- G1 Siren - Mazda RX-7
- G1 Skids - Honda City Turbo
- G1 Smokescreen - Datsun 240Z Racing
- G1 Sunstreaker - Lamborghini Countach
- G1 Tracks - Chevrolet Corvette
- G1 Trailbreaker - Toyota Hilux
- G1 Wheeljack - Lancia Stratos Turbo
- G2 Firecracker - Lamborghini Diablo
- G2 Gearhead - NASCAR Thunderbird
- G2 Gobots - Peugeot 405 T-16
- G2 Optimus Prime - Lamborghini Diablo
- G2 Sideswipe - Lamborghini Diablo
- G2 Soundwave - NASCAR Thunderbird
- Transformers Post-G2 (1997 - Present)
- Beast Wars Cheetor - Cheetah
- Beast Wars Grimlock - Velociraptor
- Beast Wars Megatron - Tyrannosaurus Rex
- Beast Wars Optimus Primal - Gorilla
- Beast Wars Rattrap - Rat
- Beast Wars Rhinox - Rhinoceros
- Machine Wars Mirage - F1 Racer
- Machine Wars Prowl - F1 Racer
- Robots In Disguise Prowl (Mach Alert) - Lamborghini Diablo Police Car
- Robots In Disguise Prowl (Super Mach Alert) - Lamborghini Diablo Police Car
- Robots In Disguise R.E.V. - Lamborghini Diablo
- Robots In Disguise Side Burn (Speedbreaker) - Dodge Viper
- Robots In Disguise Sideways - Custom Motorcycle
- Robots In Disguise WARS - NASCAR Thunderbird
- Robots In Disguise X-Brawn (Wildride)- Mercedes ML320
- Armada Hot Shot - Audi TT Custom
- Armada Mini-Cons
- Armada Sideswipe - Nissan Skyline
- Energon Hot Shot - Aston Martin DB7
- Energon Ironhide - Ford Explorer Sport Trac
- Cybertron Cannonball - Dodge Magnum R/T
- Transformers Barricade - Saleen S281
- Transformers Bumblebee - Chevrolet Camaro
- Transformers Jazz - Pontiac Solstice
- Revenge of the Fallen Bumblebee - Chevrolet Camaro
- Revenge of the Fallen Mudflap - Chevrolet Trax
- Revenge of the Fallen Sideswipe - Chevrolet Corvette
- Revenge of the Fallen Skids - Chevrolet Beat
- Dark of the Moon Leadfoot - NASCAR Impala
- Dark of the Moon Roadbuster - NASCAR Impala
- Age of Extinction Optimus Prime - Western Star 5700 OP
- Prime Bumblebee - Urbana 500
- Robots In Disguise Bumblebee - Sports Car
- Robots In Disguise Drift - Sports Car
- Robots In Disguise Sideswipe - Sports Car
- Other Car & Truck Models
- 1930s 3 window coupe hot rod
- 1958 Plymouth Fury street machine
- 1961 Chevrolet Corvette Mako Shark
- 1964 Corvette Grand Sport #67
- 1969 Chevrolet Camaro
- 1969 Dodge Charger Convertible
- 1969 Pontiac GTO modified "Supergoat"
- 1984 Chevrolet Monte Carlo SS
- 1984 Chevrolet Monte Carlo SS Redux
- 1986 Chevrolet Corvette NYPD pursuit
- 1986 Mercury Cougar
- 1987 Chevrolet Monte Carlo SS Aerocoupe LAPD interceptor
- 1990 Lamborghini Diablo CHP pursuit
- 1992 SCCA Camaro Troy PD pursuit
- 1993 Dodge Viper RT/10 modified
- 1994 Chevrolet "Campbell's Soup" #35
- 1995 Chevrolet Caprice Pro Street Taxi
- 1998 BMW custom
- 1998 Chevrolet Corvette convertible
- 1998 Volkswagen Golf
- 1998 Volkswagen New Beetle #53
- 2000 Chrysler Concorde Blackhawk PD "Road Rage" Cruiser
- 2001 BMW X5 SUV
- 2002 Ford Escape SUV
- 2004 Batman NASCAR Taurus set
- 2015 Rev Racing #4 Camry
- Custom Toys
- Special Projects
- Diorama: "The Meeting"
- Diorama Vehicle: "Corvette" Fighter
- Diorama Vehicle: Crawler Super Duty Vehicle
- Diorama Vehicle: Ferrari Testarossa
- Diorama Vehicle: Ford Mustang
- Diorama Vehicle: KONGO Prototype
- Holiday 2000 - Black Force Batmobile
- Holiday 2001 - Monte Carlo SS
- Holiday 2002 - G1 Optimus Prime
- Holiday 2003 - Knight Rider KITT
- Holiday 2004 - 1968 Batmobile
- Holiday 2005 - 1/64 TV/Movie Cars
- Holiday 2006 - Retired Stock Car
- Holiday 2007 - 1/64 TV/Movie Cars II
- Holiday 2008 - 1/18 Death Proof Charger
- Holiday 2009 - 1/64 TV/Movie Cars III
- Holiday 2010 - Camaro Concept Pace Car
- Holiday 2011 - Generations Clamp Down
- Holiday 2012 - Baman Returns Batmobile & Catwoman
- Holiday 2013 - Masters of the Universe Battle Damaged Faker
- NYC 9/11/01
Original Kit:
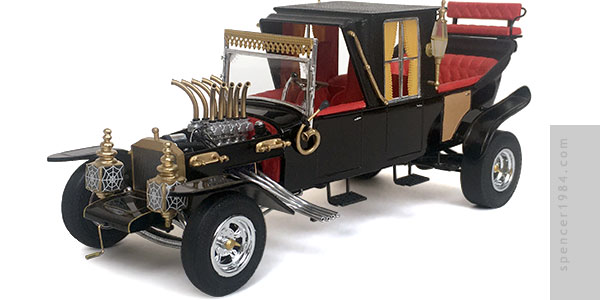
The Munsters Munster Koach & Grandpa Munster's Drag-U-La
Made By:
AMT (kit #619)
Scale:
1/25

eBayPartner Affiliate Link
Other 1960s TV Models
I had first started this kit as part of a community build project celebrating legendary designer Tom Daniel. While the bulk of his work in scale modeling could be found in the dozens of Monogram kits he came up with over the years, the Koach was also part of his repertoire. He was hired to draw up the design by Barris, then it was brought to life in Barris' shop by builders Tex Smith and Dick Dean. The final car differed from Daniel's design only in its intake manifold and headlights, and was built in a matter of three weeks. I wasn't quite so quick on mine.
That certainly wasn't the plan when I started the project, though. Going in, I thought I'd build it basically box stock with maybe a little bit of extra detailing for the ignition wires or interior carpeting. But once I really got a good look at the contents of the box, things changed.
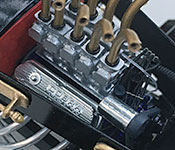
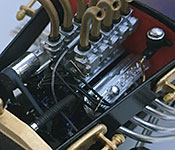
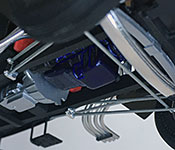
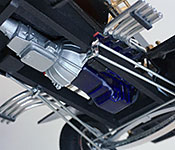
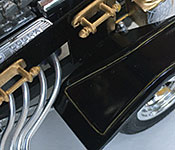
My first problem came right at the beginning of the build, when I saw what AMT had provided to represent the 289 Cobra V8. It was so undersized and badly proportioned, it made a pretty passable V6. The cast-in heads and intake manifold, single-piece belt assembly, and simplified carburetors and other details just made things worse, so I ditched pretty much everything and went with a proper 289 out of AMT's '67 Mustang GT kit. I assembled and painted the main components Boyd's Black-N-Blue Pearl, then finished it with the Mustang's chrome valve covers and parts box intake manifold and front accessories. The manifold was topped with the Koach's original "carburetors," which were lousy carbs but pretty decent spacers. The real carbs were ten individual resin cast parts from Replicas & Miniatures of Maryland topped with scratch built aluminum horns. The exhaust pipes were also scratch built - even though the kit supplied parts didn't look too bad, they were spaced for that little quasi-V6 and reshaping them to fit would have been as much work as just making them myself. Final details include basic wiring, plumbing, and carburetor linkage. The finished engine was mated to a transmission from Morgan Automotive Detail and a scratch built driveshaft using FAB Resinworks U-joints.
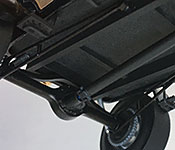
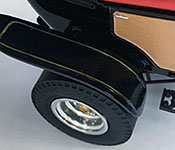
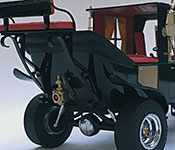
The chassis was arguably even worse. Cast as a single piece, it had no floor, little more than lumps to represent the axles, and not even a hint of true suspension details. About the only useful bit was the headlight locators, so I cut them off and binned the rest. From there I scratch built the frame rails, steering, and most of the suspension. The axles were out of my parts box, modified to match the width and stance of the Koach's parts. The front axle was then finished using a combination of Molotow Liquid Chrome and polished aluminum repair tape to give it a bright metal look, with the steering and front suspension parts painted or built from wire to match. More Molotow was used on the rear differential cover, and everything else under the car was painted in various blacks and dark grays.The wheels and rear tires were from the kit, while the brakes and front tires were from my parts box.
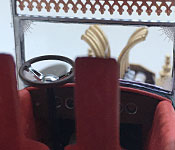
Probably the least-changed part of this whole project was the interior. Given what I had seen up to this point it was a welcome break. The floor was flocked with dark red craft suede, while the bucket and seats were painted Testors Flat Red. The curtains were painted Polly S Union Pacific Armor Yellow, and the steering wheel rim and dash face were woodgrained with several shades of brown and accented with Bare Metal Foil and Molotow. The shift lever was cleaned up and refinished with BMF, then pinned to the floor with a custom shift boot made of mini O rings. Although they're almost impossible to see on the finished model, I also added a set of Moon pedals from Detail Master.
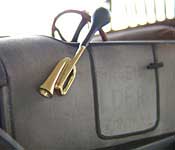
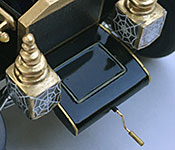
The body wasn't too bad, either...at least from the firewall back. Because of the stumpy little engine, the sides of the hood were too short, making the whole thing look out of whack. Once they were lengthened to match the longer frame I made, the proportions looked much better. These were simply sheet styrene, cut into "L" shapes with the long edge based on the measurement from the firewall to the radiator and the height based on the original kit parts. These, the main body, and the fenders were painted Tamiya TS-14 Black, and the roof panels were painted satin black. Round 2 provided decals for the pinstripes, but they were a bit heavy - as were any attempts I made to paint them. So what I did instead was to take a hobby knife and carefully scrape the paint off the raised ribs, leaving thin white pinstripes. I then went over them with a colored Sharpie, similar to what I did for my Terminator 2 Harley-Davidson. Since I wasn't using a bright, brassy gold on any other parts of the car, the result was a very believable match. The rear doors were painted Apple Barrel Caramel, using alternating brush strokes to try to accentuate the woven texture of the insert.
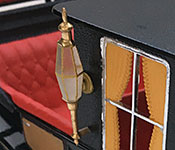
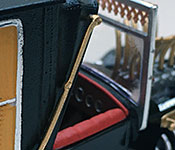
After all this, I still had to do the myriad details scattered across the body. Starting from the front: the headlight buckets, like most of the gold components in and on the car, were stripped of their chrome, cleaned up, and repainted Tamiya TS-21. I decided to go with this color instead of a bright gold chrome as I thought the brighter color would look too busy at this scale, essentially blowing out the details. I did the same for the handles on the sides of the hood and the radiator. Out of the box, the horn was too big for the car - it overlapped the sides of the hood, the door, or both. So I cut off the bulb and bell, then grafted them onto the much smaller curl from MPC Jeep. It then got a coat of the same Tamiya Gold as the other parts. My first attempt at the windshield had me simply clean up the worst of the flash and use the kit-supplied glass. But the longer I looked at it, the less satisfied I was. So I pulled the glass out and threw it away, opting instead for a sheet of flat clear sheet plastic. Fortunately, Round 2 provided two sets of spider web decals for the windshield, so I was still able to include those. While I had it apart, I also reworked the frame, thinning and rounding the edges as well as deepening the groove between the inner and outer frames. The poorly-formed wingnuts on the outside of the frame were replaced with Detail Master PE parts, and the fringe across the top bar was made from gallery wire painted the same UP yellow as the curtains. The steps were made from model railroad cemetery gates which had a neat open scroll and were just about the right size. The forward four were N scale gates straight out of the package, while the shorter rear two were HO scale gates cut down. For the side lanterns, I couldn't think of a way to save or rebuild the kit-supplied parts and opted to replace the lenses with some custom 3D printed parts I had done at Shapeways. These were then mated to the upper and lower lantern parts and painted. The taillight wasn't too bad, but the arm that connected it to the car was a huge fin. I carefully carved out everything that wasn't part of the lamp, mounted it to a new wire arm, and gave it a lens made from a craft ruby. Finally, the scrollwork for the rear seat was cut out and replaced with brass strip and the rail was made from wire.
