Original Kit:
1973 Chevelle
Made By:
Missing Link Resin
Scale:
1/25

eBayPartner Affiliate Link
Other 2010s Movie Models
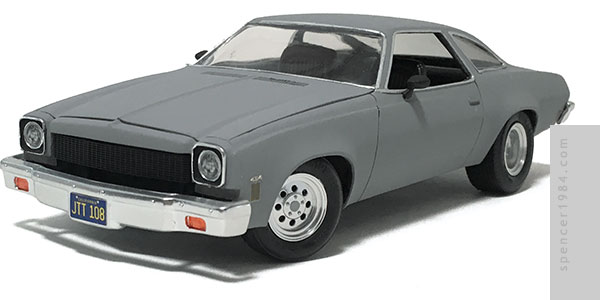
Drive was another one that I missed during its theatrical run, due in part to a trailer that managed to somehow totally spoil and yet be completely unrelated to the film it was promoting. The mixed reviews it seemed to be getting didn't help, so it was something that I'd get around to "some day." When it finally got to the top of my Netflix queue, much like my reaction to Edge of Tomorrow, I was disappointed only in how long I waited before seeing it. The tone, the style, and the attention to detail were all fantastic, and I wanted to add a replica of Driver's Chevelle to my model collection.
Unfortunately, models of cars from the mid-1970s are relatively rare. The closest thing to what I wanted was a Johan Oldsmobile Cutlass, which shared many of the components with the Chevelle but would require substantial reworking. There was also an old stock car kit of the '74 Chevelle Malibu, but that was even further away from my goal with its modified body and lack of interior.
Missing Link Resin to the rescue! I found out that Kevin had a '73 Chevelle in the works, and having already purchased his '71 Galaxie I knew it would be a quality piece. My name was added to the request list, and after a few months it was my turn. The wait was well worth it: a clean cast body, interior, and chassis; vacuu-formed glass; chrome plated bumpers, wheels, grille, and headlights; full color decals; and photoetch parts.
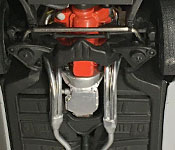
The chassis was based on AMT's '69 Oldsmobile Cutlass, and I just happened to have one in my stash from a failed custom attempt years earlier. I was able to use the front suspension, rear axle and shocks, driveshaft, and exhaust pipes from the Olds with almost no effort - just a little extra cleaning around the front where the A arms mounted to the frame. I also replaced the front sway bar and rear springs with scratch built metal components.
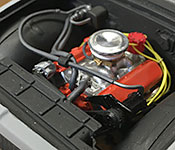
Under the hood is a 454 big block from AMT's '70 Monte Carlo, which was a tight fit but worked after I modified the transmission crossmember. None of the headers in my parts box fit the engine without hitting the inner fenders, so I scratch built a set from aluminum craft wire. Finally, I replaced the air cleaner and mechanical fan with parts from the spares box. The rest of the engine was built stock and detailed with ignition wires and basic plumbing.
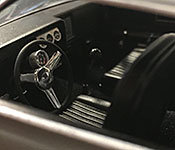
The interior was possibly the weakest part of the kit, only because there weren't really positive locators for anything and the suggested assembly left big gaps around the rear seat. I had to break out my Johan Cutlass to get a feel on how things were supposed to line up, then trimmed the resin until I got everything to work the way I wanted it to. Once I got it close, I assembled the door panels and floor with tape so that they could still flex and settle inside the body shell. Other than that caveat, the rest of the interior was as good as everything else here: sharp casting, nice fine detail, etc. I painted it flat black followed by a coat of semi-gloss clear, with flocking for the floor. The kit only included a front bench seat, so I modified a pair of "close enough" buckets from my parts box to look like they belonged. I also found a chrome three-spoke wheel that looked pretty close, scratch built the tachometer and shift lever, and made the auxiliary gauge panel from a Detail Master triple bezel and my own gauge faces.
Clean as the body was, it still needed a fair bit of sanding to remove all the side trim. I also had to remove the front splash pan, open the grille, and do some sanding around the edge of the hood to fit the opening. The upper radiator crossmember came from the same Olds kit that donated the chassis parts, and the fender flanges were made from flat styrene stock. Once the body was prepped, I sprayed it with Napa flat gray primer and gave it a light wet sanding to smooth the finish. The inside of the body and engine surround were brush painted Apple Barrel matte black. The window trim was done using a combination of aluminum tape and Molotow liquid chrome, then the whole thing was shot with Dullcote to tone down the sheen. The side markers were custom labels I printed, and the front ones are topped with "454" badges from Model Car Garage.
Final assembly was nice and easy, with the chassis, interior, and body all fitting together tightly. Due to the nature of this particular build, this stage also included a lot of "bridge" pieces: a modified radiator from the AMT Oldsmobile with a scratch built bulkhead was fit between the body and chassis; the rear parcel shelf was only fit after the interior was in the body; the engine hoses were installed between the motor, radiator, and firewall; and the wheels and tires were finalized at this stage. For these, I used a set of 8-hole Welds from a Revell pro stock/funny car kit with the rear wheels narrowed to a more appropriate depth. Tires were straight out of my parts box.
Once the major assembly work was complete, I had only a few more details. The most time-consuming of these was the windshield. While the kit's vacuu-formed part looked OK, I have yet to find one that's as clear as injection-molded windows. Plus, the thicker resin body kit meant it sat deeper in the body than I wanted. I found one in may parts box that looked close, then trimmed it to fit. This required constant test fitting, since it needed to not only fit the frame, but clear the dashboard and hood as well. The side windows were made from flat stock, fit much the same way.
To finish the front end, I made a set of arms for the front bumper (since the splash pan was no longer available as a mount) and used some PE model railroad walkway for the custom grille. The headlights were detailed with painted buckets and my own lens decals.