Site Features
Getting Started in the Hobby
Model Categories
- TV, Movie, & Pop Culture (Titles # - A)
- 7th Heaven Renault Type AG
- 200 MPH Nissan 370Z
- 2001: A Space Odyssey Monolith
- 2012 Lincoln Town Car Limo
- 2044 Peacekeepers Ford Expedition
- 3000 Miles to Graceland 1959 Cadillac
- A-Team Chevrolet Corvette
- A-Team GMC Van
- Addams Family Limo
- Adderall (Corvette Corvette) 2021 Corvette
- Adventures of Jimmy Neutron Rocket
- Agents of SHIELD Hell Charger
- Agents of SHIELD Lola
- Alone in the Dark VW Touareg
- American Graffiti '32 Ford Coupe
- "The Animal" Angry ATV
- Animal House Deathmobile
- Animal Precinct Crown Victoria
- Atomic Blonde Porsche 911
- Austin Powers Shaguar
- Austin Powers 3 Shaguar
- Automan Lamborghini Countach
- Avatar AT-99 Scorpion
- Avengers Lotus Elan
- Avengers Grimm Camaro ZL1
- TV, Movie, & Pop Culture (Titles B)
- Back to the Future DeLorean Time Machine
- Bang Bang Challenger
- Barbie Silver Vette
- Baywatch Ford Ranger
- Bedazzled Lamborghini Diablo
- Beetle Bailey Jeep
- Bertha Benz: The First Driver Benz Patent Motorwagen
- Beverly Hillbillies Truck
- Beverly Hills Cop Nova
- Bigfoot & the Muscle Machines Bigfoot
- Bigfoot & the Muscle Machines Black Gold
- Bigfoot & the Muscle Machines Orange Blossom Special II
- Bigfoot & the Muscle Machines War Lord
- Birds of Prey Hummer H2
- Black Mirror MX-5 Miata
- Black Swan Taxi
- Black Top Warriors Alley Rat
- Black Top Warriors Killer Bee
- Black Top Warriors Pink Poison
- Blade 1968 Dodge Charger
- Blade Runner Spinner
- Blonde Comet Kurtis Kraft
- Blood Drive 1967 Camaro
- Born 2 Race Subaru Impreza WRX STi
- Bounty Killer Ford Mustang
- Bourne Identity Mini
- Bourne Ultimatum NYPD Impala
- Brazil Microcar
- Bruce Almighty Saleen S7
- Bullitt Mustang
- Bullitt Charger
- TV, Movie, & Pop Culture (Titles C)
- C'était un rendez-vous Ferrari 275 GTB
- Captain America: The Winter Soldier Chevrolet Corvette
- The Car Lincoln Continental Custom
- Cars Lightning McQueen
- Cars Sarge
- Cars 3 Cruz Ramirez
- Cars that Ate Paris VW
- Charlie's Angels 1969 Camaro
- Chase BMW 325is
- Chuck Norris Karate Kommandos Corvette
- Circuit Wolf BMW 3.0 CSL
- Circuit Wolf Lamborghini Jota
- Circuit Wolf Lamborghini Miura

- Circuit Wolf Lotus Europa
- "City Slicker" 1969 Dodge Charger
- Circles Around this Town Dodge Diplomat
- Cobra 1950 Mercury
- Collier & Co. Traveller
- Crawling Eye Citroen Traction Avant
- Crusher Joe Hunter "Diskhound"
- CSI: Miami Hummer H2
- Ctrl-Alt-Del X-Bot Zeke
- TV, Movie, & Pop Culture (Titles D)
- Danger Mouse Mk III
- Dark Harvest 2: The Maize Durango
- Dark Shadows Barnabas Vampire Van
- Day of the Cheetah XF-15F
- Day the Earth Stood Still Gort
- Dead Pool Corvette R/C Car
- Deadpool Taxi
- Death Proof Dodge Challenger
- Death Racers Lotus Elise
- Demolition Man Oldsmobile 442
- Deuce of Spades Ford Roadster
- Diamonds are Forever Mustang
- Dick Tracy 1936 Ford
- Dilbert Carbicle
- Dirty Dancing 1957 Chevrolet
- Dirty Dozen Jeep
- Dirty Mary, Crazy Larry 1969 Dodge Charger
- Doctor Who TARDIS
- Dr. No Sunbeam Alpine
- Drag it Out 2020 Corvette
- Draw 50 Monsters... UR2EZ
- Drive 1973 Chevelle
- Driven Target CART Racer
- Driver's License Mercedes-Benz 450 SL
- Duel Peterbilt Tanker
- Dukes of Hazzard General Lee
- Dukes of Hazzard General Lee (undercover)
- Dukes of Hazzard Jeep
- Dukes of Hazzard Roadrunner
- Dukes of Hazzard (movie) General Lee
- Dukes of Hazzard (AutoTrader) Viper
- Dune Sand Crawler
- TV, Movie, & Pop Culture (Titles E - F)
- Edge of Tomorrow Sgt Rita Vratraski
- Evangelion Renault Alpine A310
- Evangelion (Rebuild) Mazda Cosmo Sport
- eX-Driver Lancia Stratos
- eX-Driver Lotus Europa
- Explorers Thunder Road
- Fahrenheit 451 Salamander
- Fallout Highwayman
- Fast & Furious (Complete Series)
- Fast & the Furious (1955) Jaguar XK120
- Finish Line Shelby Cobra 427 S/C
- Fireball 500 Kustom Plymouth
- Flintstones Flintmobile
- Flintstones Fred's Cruiser
- Forbidden Planet Robby the Robot
- Ford v Ferrari GT40
- Ford v Ferrari 330 P
- Fortnite Red-Nosed Raider
- Frame Arms Gourai and Mechatro WeGo
- From Russia with Love Chevrolet Truck
- TV, Movie, & Pop Culture (Titles G)
- Galactic Drifter Vifam EVA-WP-4000 Allover
- Galactic Drifter Vifam EVA-WP-6000 Twinklehead
- Garbage Pail Kids Hot Head Harvey/Roy Bot
- Gattaca Citroen DS 19
- Genesis Climber MOSPEADA Ride Armor VR-038L
- Genesis Climber MOSPEADA Ride Armor VR-052F
- Ghost in the Shell Motoko Kusanagi
- Ghostbusters Pre-Ectomobile
- Ghostbusters Ecto-1
- Ghostbusters (RGB) Ecto-1
- Ghostbusters 2 Ecto-1A
- Ghostbusters: The Video Game Ecto-1B
- Ghostbusters (LEGO Dimensions) Ecto-1
- G.I. Joe RAM
- Godzilla: Invasion of Astro-Monster Planetary Defense Vehicle Willys Jeep MB
- Goldeneye BMW Z3
- Goldfinger Aston Martin DB5
- Gone in 60 Seconds (1974) Eleanor Mustang
- Gone in 60 Seconds 2 Slicer
- Good Guys Wear Black Porsche
- Gotcha! Citroën 2CV
- Graduate Alfa Romeo 1600
- Grease White Lightning
- Great Escape Motorcycle
- Green Hornet Black Beauty
- Gremlins Toy Corvette
- Gremlins VW Beetle
- Gunsmith Cats 1967 Shelby GT-500 Mustang
- TV, Movie, & Pop Culture (Titles H - I)
- H.G. Wells' War of the Worlds Monte Carlo SS
- Hairspray 1961 Corvette
- Half-Life 2: Episode 2 Muscle Car
- Halo M12B Tundra Warthog
- Harry Potter and the Chamber of Secrets Anglia 105E
- Hate You Hummer H2
- Hatsune Miku
- Heart Like a Wheel Mustang Funny Car
- Hell Comes to Frogtown Chevrolet Panel Truck
- Herbie The Love Bug VW Beetle
- Herbie Rides Again VW Beetle
- Hidalgo
- Highway Patrol Buick
- Honey West Shelby Cobra 289
- Hooper Firebird Trans Am
- Hot for Teacher Ford Phaeton
- Hot Rods to Hell Corvette
- Hot Wheels "Sweet 16" Silhouette
- House of Wax 1968 Dodge Charger
- I Am Legend Shelby GT-500 Mustang
- "I Want to Believe" UFO
- Indiana Jones and the Last Crusade Motorcycle
- Inspector Gadget Gadgetmobile
- Inglorious Bastards Jeep
- Interstellar Pig VW Convertible
- The Island Chevrolet SSR
- It's Walky! 1986 Dodge Ram 50
- It's Yourz Dodge Viper
- iZombie Police Car
- TV, Movie, & Pop Culture (Titles J - K)
- Jack Reacher 1970 Chevelle
- Jaws Chevy Blazer
- Jericho 1969 Plymouth Roadrunner
- Jetsons Spaceship
- Jigoro Jigorou Nana Okada's Toyota Celica
- Jimmy Neutron: Boy Genius Rocket
- Joe Dirt 1969 Dodge Charger Daytona
- Judge Parker Corvette
- Junkman 1981 Corvette
- Jurassic Park Jeep Wrangler
- Jurassic Park Toyota Land Cruiser
- Jurassic Park 2 (The Lost World) Ford Explorer
- Jurassic Park 2 (The Lost World) Hunter's Humvee "Snagger"
- Jurassic World Mercedes-Benz G550
- Kamen Rider Cyclone
- Kamen Rider Hurricane
- Kamen Rider New Cyclone
- Karate Kid Ford Convertible
- Kelly's Heroes Jeep
- Kia Hamstar Box
- Knight Rider Classic KITT
- Knight Rider Legends KITT
- Knight Rider Camaro KITT
- Knight Rider 2000 Knight 4000 (KIFT)
- TV, Movie, & Pop Culture (Titles L)
- Lamborghini American Challenge Diablo Roadster
- Land of Confusion Tank
- Last of Us Chevy S-10
- Last Stand Camaro
- Left 4 Dead 2 Jimmy Gibbs, Jr. Stock Car
- Legends of the Superheroes Batmobile
- LEGO 2K Drive Modified Race Cars
- LEGO Dimensions Ecto-1
- LEGO Movie Super Cycle
- LEGO Movie 2 Escape Buggy
- Levitating 1969 Barracuda
- Little Old Lady from Pasadena 1964 Dodge 330 Super Stock
- Little Red Corvette 1957 Corvette
- Live a Little, Love a Little Meyers Manx
- Love Bug Herbie
- Lupin III: Castle of Cagliostro Fiat 500
- TV, Movie, & Pop Culture (Titles M)
- Mac and Me Power Wheels Truck
- Mad Max Holden Sandman
- Magnum, P.I. Ferrari 308 GTS
- Mall Monkeys Security Vehicle
- Man from U.N.C.L.E. Piranha
- Man with the Golden Gun AMC Hornet
- Mannix Oldsmobile Toronado Roadster
- Married...With Children Dodge
- Matchbox '83 Corvette
- Matchbox Bedford Wreck Truck
- Matrix: Reloaded Escalade
- Mechatro WeGo Sports #7 (JPN)
- Mega Shark vs Giant Octopus Mini Cooper
- Megafault Dodge Ram
- Men in Black 3 Ford Galaxie
- Metal Slug SV-001/I
- Miami Vice Ferrari 365GTS/4 Daytona
- Micro Machines Charger
- Misfile BMW M3
- Misfile Acura RSX-S
- Misfile Jaguar XKR
- Misfile Merkur XR4Ti
- Misfile Merkur XR4Ti Monster
- Misfile Nissan 240SX
- 『Moi』JGSDF 07 Tank Nacchin
- Monkees Monkeemobile
- Monster Garage Nut Shaker
- Monster Garage Wedding Chapel
- Mouse and the Motorcycle Bike
- Munsters Drag-U-La
- Munsters Koach
- Murciélago Lamborghini Roadster
- Mythbusters Impala Rocket Car
- TV, Movie, & Pop Culture (Titles N - Q)
- Need for Speed 2015 Mutang GT
- Neon Genesis Evangelion Renault Alpine A310
- Never Too Young to Die Corvette
- New Monkees Mustang GT
- Night is Still Young Lamborghini Murciélago
- Night Watch Audi TT
- A Nightmare on Elm Street Cadillac Convertible
- Ninja Cheerleaders VW Beetle Convertible
- Ninjago Ultra Sonic Raider
- Ocean's Eleven Ford Falcon Futura
- Outer Space Men Terra Firma
- Over Rev! Toyota MR2
- OutRun (Kavinsky) Ferrari Testarossa
- OutRun (Sega) Ferrari Testarossa
- The Outsider 1969 Dodge Charger
- P2 Oldsmobile Cutlass Supreme
- Paprika Aston Martin DB7
- Paris, Texas Ranchero
- Pearls Before Swine Revenge-O-Mobile
- Philadelphia Experiment 1968 Dodge Charger
- Piranha 3D Police Car
- Porky's Hudson Hornet
- Portal 2 Defective Sentry
- Pretty Fly (for a White Guy) Pinto
- Princesses vs. Zombies Ferrari 250
- The Prisoner Lotus 7
- PvP Mini Cooper
- Queens Logic VW Beetle
- TV, Movie, & Pop Culture (Titles R)
- Race Forever Lancia Stratos
- Raiders Coach
- Rain Man Buick Roadmaster
- Ready Player One Ecto-88
- Real Drift Corvette Z06
- Real Ghostbusters Ecto-1
- Rebuild of Evangelion Mazda Cosmo Sport
- Red Line 7000 Ford Galaxie
- Red Notice Porsche Taycan
- Resident Evil Raccoon City Police Car
- Rick and Morty Space Cruiser
- Riptide 1960 Corvette
- Robot Chicken: Turbo Teen Parody
- Robotech Cyclone VR-038
- Robotech Cyclone VR-052
- Rocket Car 1959 Chevy Impala
- Romancing the Stone Little Mule
- Rush McLaren M23
- Rush Hour 1972 Corvette
- TV, Movie, & Pop Culture (Titles Sa-Sm)
- Safe Crown Victoria
- Scooby Doo Mystery Machine
- Scooby Doo/We've Got Some Work to Do Now Misery Machine
- Sex Drive 1969 GTO
- Shakotan Boogie Toyota Celsior
- Shakotan Boogie Yanky Mate!
- Sharky's Machine Dodge Diplomat
- Short Time Dodge Diplomat
- Silver Spectrum Ford Deluxe
- Silverhawks Steelheart
- Simpsons Canyonero
- Simpsons Family Sedan
- Simpsons Honor Roller
- Simpsons Malibu Stacy Car
- Simpsons Mr. Plow
- Smokey & the Bandit Firebird
- Smokey & the Bandit 2 Firebird
- TV, Movie, & Pop Culture (Titles Sn-Sz)
- Sound of Music Mercedes-Benz 540K
- Space: 1999 Moon Buggy
- Speed Buggy Speedy
- Speed Demon 1970 Chevelle
- Speed Racer F1 Mach V
- Speedway Dodge Charger
- Spiral Zone Unicycle & Zone Rider
- Spy Who Loved Me Lotus
- SpyHunter Lamborghini Diablo
- SpyHunter 2 Saleen S7
- Star Trek Galileo
- Star Wars (Complete Series)
- Starsky & Hutch Ford Torino
- State of Fear Ferrari 365GTS/4 Daytona
- Steel Monsters Enforcer
- Steven Universe Van
- Stingray 1965 Corvette
- Stranger Things Chevy Van
- Stroker Ace Chicken Pit Special
- "Stylo" Camaro
- Super Robot Mach Baron Mach Trigger
- Supercar
- Supernatural 1967 Impala
- Supernatural 1971 Chevelle
- TV, Movie, & Pop Culture (Titles T)
- Taarzan the Wonder Car Honda CRX
- Tekkonkinkreet Colt Galant
- Terminator Custom Chevy Pickup
- Terminator 2 Cyberdyne T-800
- Terminator 2 Harley-Davidson
- Terminator 3 Lexus SC430
- Thinner Chevy Nova
- Three Stooges Ford Panel Truck
- Thunderbolt & Lightfoot Firebird
- Thundercats Cheetara
- Tomb Raider: Cradle of Life Jeep
- Top Gear The Stig
- Toy Story Pizza Planet Delivery Truck
- Trail of Lightning 1972 Chevy Pickup
- Transformers (Complete Series)
- Transmorphers: Fall of Man Police Car
- Transporter BMW 735i
- Trollenberg Terror Citroen Traction Avant
- Tron Legacy Clu's Light Cycle
- Tron Legacy Sam's Light Cycle
- Turbo Teen
- Turbo Teen (Robot Chicken Parody)
- Twilight 1963 Chevy Step Side
- Two and a Half Men Mercedes CL
- TV, Movie, & Pop Culture (Titles U - Z)
- V Laser Jeep
- Vacation Wagon Queen Family Truckster
- Vanishing Point Dodge Challenger
- Vanishing Point (1997) Dodge Challenger
- Vifam EVA-WP-4000 Allover
- Vifam EVA-WP-6000 Twinklehead
- V.I.P. Jaguar XK8
- Viper Dodge Stealth R/T
- Viper Dodge Viper GTS
- Viper Dodge Viper RT/10
- Walking Dead M35A3
- Walking Dead Triumph Bonneville Chopper
- Walking Dead Winnebago Chieftain
- WALL·E
- Wangan Midnight Devil Z
- War of the Worlds Monte Carlo SS
- Wayne's World AMC Pacer "Mirthmobile"
- The Wedding Singer DeLorean
- Wheels of Terror Dodge Charger
- White Line Fever Blue Mule
- Winning Eagle Offenhauser
- World is Not Enough BMW
- xXx 1967 GTO
- You're Under Arrest: No Mercy! Police Car
- Zessyaka! Subaru 360 Deluxe
- Zombieland Cadillac Escalade
- ZZ Top Eliminator
- Batmobiles (1930s - 1970s)
- 1939 Detective Comics #27 Batmobile (Batman's First Car)
- 1944 Batman #20 Batmobile
- 1944 Batman #25 Batmobile
- 1948 Batman #47 Batmobile
- 1950 Detective Comics #156 Batmobile
- 1952 Batman #73 Batmobile
- 1964 Batman #164 Batmobile
- 1966 Batman Batmobile
- 1968 Detective Comics #377 Batmobile
- 1969 Detective Comics #394 Batmobile
- 1970 Detective Comics #400 Batmobile
- 1972 Detective Comics #420 Batmobile
- 1972 Batman #246 Batmobile
- 1977 Batman #288 Batmobile
- 1979 Legends of the Superheroes Batmobile
- Batmobiles (1980s - Present)
- 1980 Batman #330 Batmobile
- 1987 Batman #408 cover Batmobile
- 1987 Batman #408 interior Batmobile
- 1989 Detective Comics #597 Batmobile
- 1989 Batman Batmobile
- 1989 Batman Batmobile (1/32 scale)
- 1990 Legends of the Dark Knight #5 Batmobile
- 1992 Batman the Animated Series Batmobile
- 1992 Batman Returns Batmobile
- 1992 Batman Returns Batmissile
- 1995 Batman Forever Batmobile
- 1997 Batman & Robin Batmobile
- 2001 Gotham Knights #16 Batmobile
- 2004 Teen Titans #9 Batmobile
- 2005 Detective Comics #800 Batmobile
- 2005 Batman Begins/The Dark Knight Batmobile
- 2005 Batman/Danger Girl Batmobile
- 2006 Legends of the Dark Knight #198 Batmobile
- 2006 Batman: Man-Bat Batmobile
- 2008 Batman and the Outsiders #8 Batmobile
- 2008 LEGO Batman Batmobile
- 2016 Batman v Superman Batmobile
- 2017 The LEGO Batman Movie Batmobile
- 2017 The LEGO Batman Movie Ultimate Batmobile
- Custom 1970 Batmobile (Hallmark)
- Custom 1995 Batmobile
- Phantom "Black Force" Batmobile
- The Fast and the Furious
- Fast & the Furious 1 (TF&TF) 1970 Chevrolet Chevelle
- Fast & the Furious 1 (TF&TF) 1970 Dodge Charger
- Fast & the Furious 1 (TF&TF) Honda Civics
- Fast & the Furious 1 (TF&TF) Mazda RX-7
- Fast & the Furious 2 (2 Fast, 2 Furious) Mitsubishi Eclipse Spyder
- Fast & the Furious 4 (Fast & Furious) 1970 Dodge Charger
- Fast & the Furious 5 (Fast Five) 1963 Ford Galaxie
- Fast & the Furious 5 (Fast Five) 1970 Dodge Charger
- Fast & the Furious 5 (Fast Five) Dodge Charger Rio Police
- Fast & the Furious 5 (Fast Five) Nissan GT-R (R35)
- Fast & the Furious 6 (Furious 6) 1969 Dodge Charger Daytona
- Fast & the Furious 7 (Furious 7) 1970 Dodge Charger
- Fast & the Furious 7 (Furious 7) 1970 Dodge Charger (Off-Road)
- Fast & the Furious 7 (Furious 7) 1972 Plymouth ‘Cuda
- Fast & the Furious 7 (Furious 7) McLaren MP4-12C
- Fast & the Furious 7 (Furious 7) Toyota Supra
- Fast & the Furious 8 (Fate of the Furious) Plymouth GTX
- M.A.S.K.
- Star Wars
- Transformers G1/G2 (1984 - 1995)
- G1 Bluestreak (Anime) - Datsun 280ZX
- G1 Bluestreak - Datsun 280ZX
- G1 Bumblebee - Volkswagen Beetle
- G1 Camshaft - Mazda RX-7
- G1 Cliffjumper - Porsche 924
- G1 Hoist - Toyota Hilux Tow Truck
- G1 Hound - U.S. Army Jeep
- G1 Huffer - Yard Truck
- G1 Ironhide - Nissan Onebox Vanette
- G1 Kup - Pickup Truck
- G1 Jazz - Porsche 935
- G1 Ladybug - Volkswagen Beetle
- G1 Mirage - Ligier JS-11
- G1 Mixmaster - Cement Mixer
- G1 Nightbeat - Porsche 959
- G1 Optimus Prime - Freightliner COE
- G1 Prowl - Datsun 280ZX Police Car
- G1 Ratchet - Nissan Onebox Ambulance
- G1 Red Alert - Lamborghini Countach
- G1 Road Rage - Chevrolet Corvette
- G1 Sideswipe - Lamborghini Countach
- G1 Siren - Mazda RX-7
- G1 Skids - Honda City Turbo
- G1 Smokescreen - Datsun 240Z Racing
- G1 Sunstreaker - Lamborghini Countach
- G1 Tracks - Chevrolet Corvette
- G1 Trailbreaker - Toyota Hilux
- G1 Wheeljack - Lancia Stratos Turbo
- G2 Firecracker - Lamborghini Diablo
- G2 Gearhead - NASCAR Thunderbird
- G2 Gobots - Peugeot 405 T-16
- G2 Optimus Prime - Lamborghini Diablo
- G2 Sideswipe - Lamborghini Diablo
- G2 Soundwave - NASCAR Thunderbird
- Transformers Post-G2 (1997 - Present)
- Beast Wars Cheetor - Cheetah
- Beast Wars Grimlock - Velociraptor
- Beast Wars Megatron - Tyrannosaurus Rex
- Beast Wars Optimus Primal - Gorilla
- Beast Wars Rattrap - Rat
- Beast Wars Rhinox - Rhinoceros
- Machine Wars Mirage - F1 Racer
- Machine Wars Prowl - F1 Racer
- Robots In Disguise Prowl (Mach Alert) - Lamborghini Diablo Police Car
- Robots In Disguise Prowl (Super Mach Alert) - Lamborghini Diablo Police Car
- Robots In Disguise R.E.V. - Lamborghini Diablo
- Robots In Disguise Side Burn (Speedbreaker) - Dodge Viper
- Robots In Disguise Sideways - Custom Motorcycle
- Robots In Disguise WARS - NASCAR Thunderbird
- Robots In Disguise X-Brawn (Wildride)- Mercedes ML320
- Armada Hot Shot - Audi TT Custom
- Armada Mini-Cons
- Armada Sideswipe - Nissan Skyline
- Energon Hot Shot - Aston Martin DB7
- Energon Ironhide - Ford Explorer Sport Trac
- Cybertron Cannonball - Dodge Magnum R/T
- Transformers Barricade - Saleen S281
- Transformers Bumblebee - Chevrolet Camaro
- Transformers Jazz - Pontiac Solstice
- Revenge of the Fallen Bumblebee - Chevrolet Camaro
- Revenge of the Fallen Mudflap - Chevrolet Trax
- Revenge of the Fallen Sideswipe - Chevrolet Corvette
- Revenge of the Fallen Skids - Chevrolet Beat
- Dark of the Moon Leadfoot - NASCAR Impala
- Dark of the Moon Roadbuster - NASCAR Impala
- Age of Extinction Optimus Prime - Western Star 5700 OP
- Prime Bumblebee - Urbana 500
- Robots In Disguise Bumblebee - Sports Car
- Robots In Disguise Drift - Sports Car
- Robots In Disguise Sideswipe - Sports Car
- Other Car & Truck Models
- 1930s 3 window coupe hot rod
- 1958 Plymouth Fury street machine
- 1961 Chevrolet Corvette Mako Shark
- 1964 Corvette Grand Sport #67
- 1969 Chevrolet Camaro
- 1969 Dodge Charger Convertible
- 1969 Pontiac GTO modified "Supergoat"
- 1984 Chevrolet Monte Carlo SS
- 1984 Chevrolet Monte Carlo SS Redux
- 1986 Chevrolet Corvette NYPD pursuit
- 1986 Mercury Cougar
- 1987 Chevrolet Monte Carlo SS Aerocoupe LAPD interceptor
- 1990 Lamborghini Diablo CHP pursuit
- 1992 SCCA Camaro Troy PD pursuit
- 1993 Dodge Viper RT/10 modified
- 1994 Chevrolet "Campbell's Soup" #35
- 1995 Chevrolet Caprice Pro Street Taxi
- 1998 BMW custom
- 1998 Chevrolet Corvette convertible
- 1998 Volkswagen Golf
- 1998 Volkswagen New Beetle #53
- 2000 Chrysler Concorde Blackhawk PD "Road Rage" Cruiser
- 2001 BMW X5 SUV
- 2002 Ford Escape SUV
- 2004 Batman NASCAR Taurus set
- 2015 Rev Racing #4 Camry
- Custom Toys
- Special Projects
- Diorama: "The Meeting"
- Diorama Vehicle: "Corvette" Fighter
- Diorama Vehicle: Crawler Super Duty Vehicle
- Diorama Vehicle: Ferrari Testarossa
- Diorama Vehicle: Ford Mustang
- Diorama Vehicle: KONGO Prototype
- Holiday 2000 - Black Force Batmobile
- Holiday 2001 - Monte Carlo SS
- Holiday 2002 - G1 Optimus Prime
- Holiday 2003 - Knight Rider KITT
- Holiday 2004 - 1968 Batmobile
- Holiday 2005 - 1/64 TV/Movie Cars
- Holiday 2006 - Retired Stock Car
- Holiday 2007 - 1/64 TV/Movie Cars II
- Holiday 2008 - 1/18 Death Proof Charger
- Holiday 2009 - 1/64 TV/Movie Cars III
- Holiday 2010 - Camaro Concept Pace Car
- Holiday 2011 - Generations Clamp Down
- Holiday 2012 - Baman Returns Batmobile & Catwoman
- Holiday 2013 - Masters of the Universe Battle Damaged Faker
- NYC 9/11/01
Original Kit:
Scooby Doo Mystery Machine
Made By:
Polar Lights (kit #814)
Scale:
1/24

Other Cartoon & Anime Models
Other 1960s TV Models
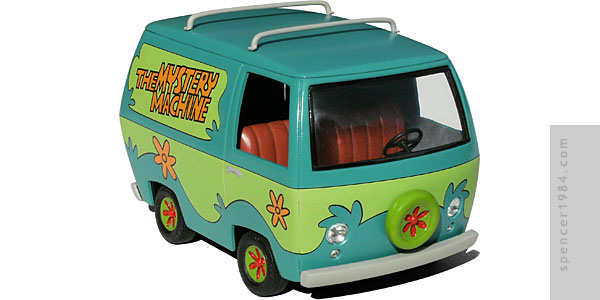
As I have noted elsewhere, I will occasionally revisit a kit if my first build was unsatisfactory. One of the kits near the top of that list was the Mystery Machine: my first version of it was OK, but I knew I could do better.
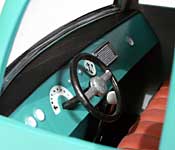
My biggest problem with it was the green areas: the original Polar Lights stickers were not quite accurate, and suffered from being printed on thick, inflexible paper with fragile ink that wore off easily. My own custom paint was a good match color-wise, but was thicker than I wanted. Unrelated to these problems, my color choices inside the body were too dark, and I wanted to fix that as well. Finally, the time came when I pulled the finished model off the shelf to give it a full rebuild.
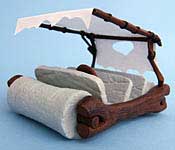
First, the kit was almost completely disassembled. The chassis/wheels/tires assembly had already been upgraded during my first build (kudos once again to whoever at Polar Lights made sure that the Mystery Machine could use standard 1/24 scale parts), so I left that alone. Everything else was broken down to the individual parts, and the body, dash pad, roof rails, and bumpers were sanded down to raw plastic.
I was still happy with how the front seat turned out, and didn't want to lose that during this rebuild. So I masked it off before repainting the cargo floor. I also masked off the dash face so that I could paint just the pad. Krylon has discontinued the Teal that I used the first time, but fortunately I still had plenty to repaint the body. Once the teal was dry, the inside of the van was painted a medium gray.
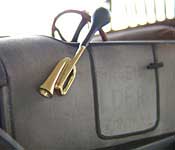
I worked with the folks at Reprolabels to create a better, more accurate set of markings for the van. It took a few tries, but eventually we were able to arrive at a good set that should also work for other customs (should someone want to build a Pinewood Derby Mystery Machine or convert a Ford/Dodge/VW diecast van into a Mystery Machine). They're printed on stock with a little give to it, and the ink is pretty indestructible, so they do a good job adhering to the bulbous van body. The set was also designed to have as few breaks as possible: a single cut at each corner with an X-Acto or a pair of scissors is all that is required.
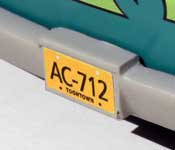
Now that the interior and body were done, the only thing left was the trim. First, I reshaped the rear bumper bracket to accept a proper 1/24 scale license plate. Then it was time for paint. Bright chrome seemed a little out of place on what was supposed to be a kids' van - most "cheap" trucks and vans at the time had painted bumpers, mirror housings, etc. - so I was going to go with a light color for these parts instead. I painted the bumpers and roof rack Flat Gull Gray as a primer, but ended up liking the look so much that I stopped there. The components were then reassembled, and I had a much better looking Mystery Machine in my collection.
